1. A Docker Image Is a Stack of Layers
What Is a Layer?
In a Dockerfile, one instruction = one layer. Each layer stores only the diff from the previous layer. Think of it like a Git commit.
FROM ubuntu:22.04             # Layer 1: base image
RUN apt-get update            # Layer 2: update package list
RUN apt-get install -y nginx  # Layer 3: install nginx
COPY index.html /var/www/     # Layer 4: copy file
Layer Size
There is no upper limit on layer size. If RUN yum install something installs 500MB worth of packages, that entire 500MB becomes a single layer.
Core Principle: All Image Layers Are Read-Only
Once a layer is created, it cannot be modified. This is the foundation for every design principle that follows.
2. Why Layer Design Matters
Downsides of Too Many Layers
- Image size can grow unnecessarily — The key issue isn’t the number of layers per se, but that a file created in one layer cannot truly be removed by deleting it in a later layer.
- Slower builds — Each layer involves creating and storing an intermediate image, which can slow down the build process.
- Layer count limits — overlay2 supports up to 128 layers. (The older AUFS supported 42, and the original overlay supported only 2.)
The “Deleted But Not Gone” Problem
# Bad: 2 separate layers
RUN yum install -y nginx        # Layer: nginx + cache files are saved
RUN yum clean all                # Layer: only records "deleted"; the cache above remains

# Good: 1 combined layer
RUN yum install -y nginx && yum clean all   # install + cleanup in one layer
Because layers are read-only, files created in one layer cannot be removed from the image by running a delete command in a later layer. Only a record of “this was deleted” gets added to the new layer.
Splitting vs. Combining yum install
# Version A: 3 layers — yum install runs 3 times
RUN yum install -y nginx
RUN yum install -y python3
RUN yum install -y git

# Version B: 1 layer — yum install runs once
RUN yum install -y nginx python3 git
Every time yum install runs, it downloads and caches repository metadata.
Version A accumulates three rounds of cache, and since each layer is read-only, the cache from a previous layer cannot be removed.
Metadata cache is usually a few tens of MB, but for large packages (dev toolchains, Java JDK, etc.), the downloaded .rpm files also remain in cache, potentially growing to hundreds of MB.
Real-World Best Practice
RUN yum install -y nginx python3 git && \
    yum clean all && \
    rm -rf /var/cache/yum
By doing the install and cache cleanup in a single layer, the cache never ends up in the final image.
3. Copy-on-Write (CoW)
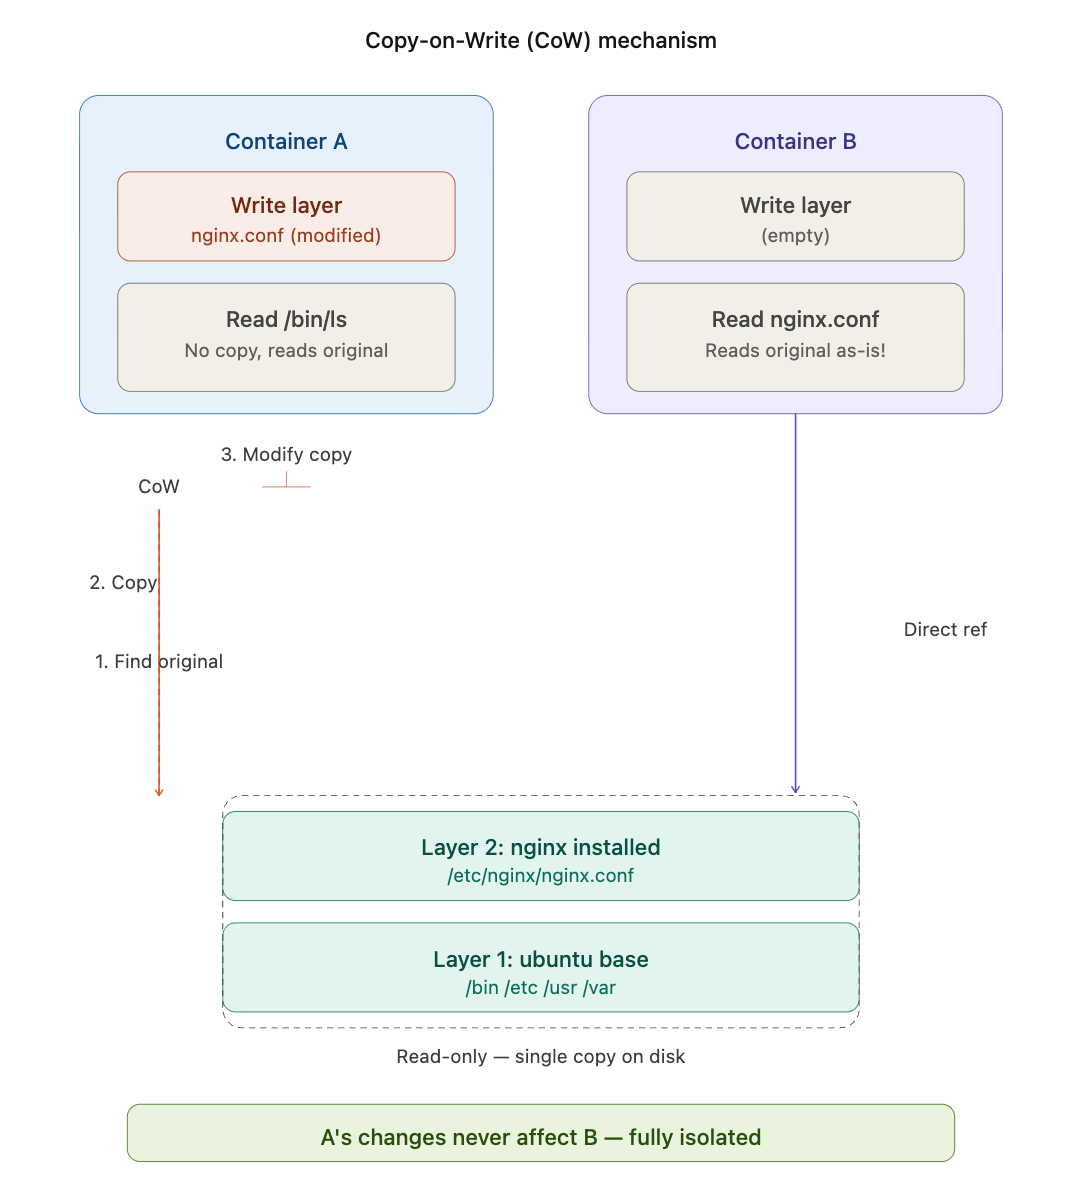
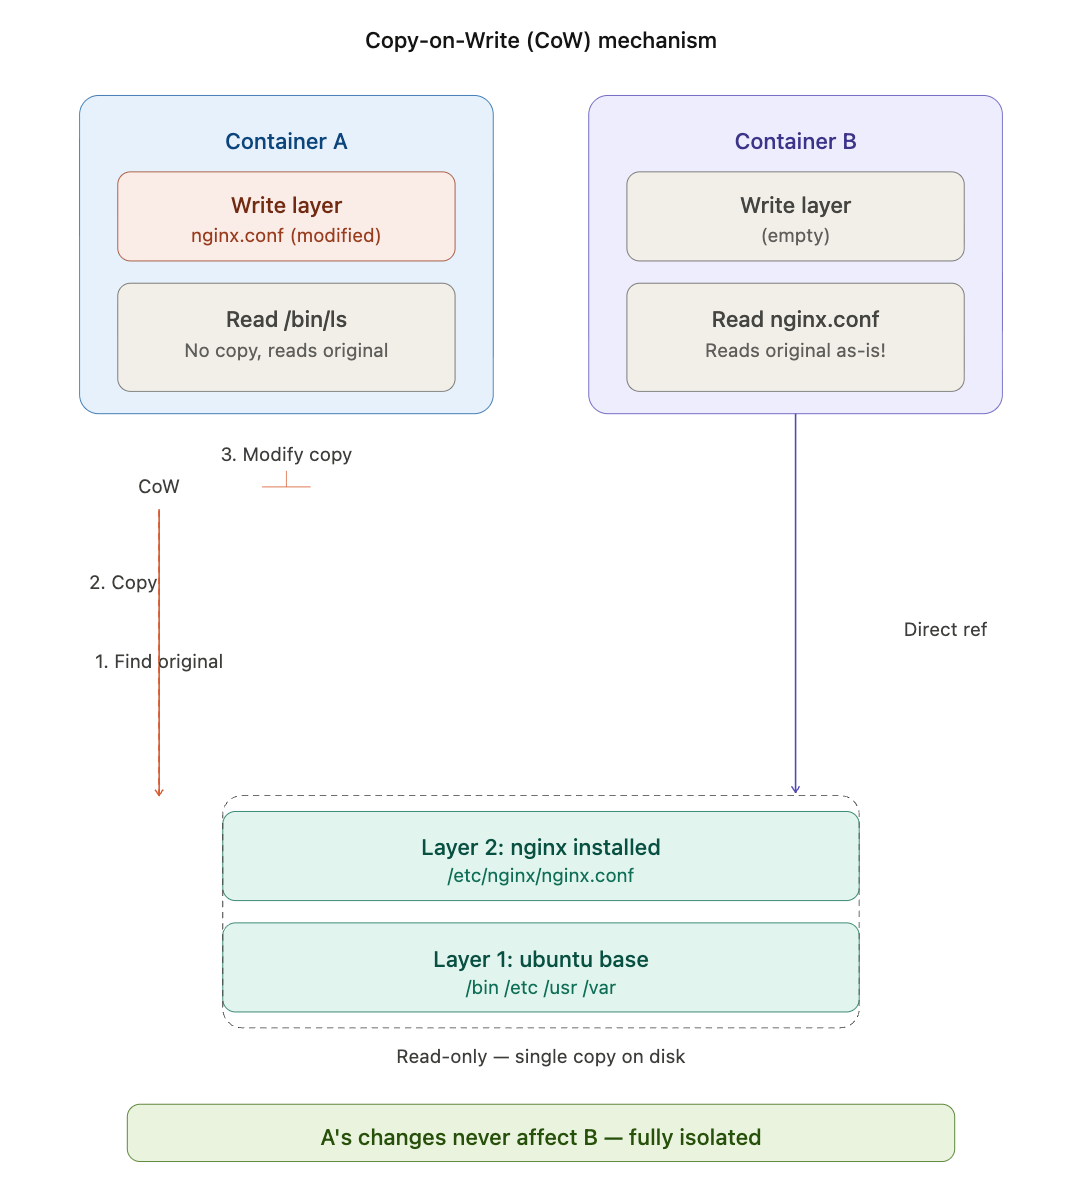
Structure When a Container Runs
When a container starts, a thin writable layer is added on top of the read-only image layers.
┌─────────────────────────┐
│  Container Writable Layer │  ← Read/write (unique per container)
├─────────────────────────┤
│  Layer 4: COPY index.html │  ← Read-only
│  Layer 3: install nginx   │  ← Read-only
│  Layer 2: apt update      │  ← Read-only
│  Layer 1: ubuntu base     │  ← Read-only
└─────────────────────────┘
How CoW Works
Read: Scans layers from top to bottom, finds the file, and returns it. No copying.
Write: Copy-on-Write kicks in!
- Locate the original file in the read-only layers below
- Copy that file up to the top writable layer
- Modify the copy
The original layer is never touched. Only the specific file being written is copied — not the entire image.
Images and Containers Are Different Things
To understand why CoW is efficient, it helps to clearly separate image building from container running as two distinct phases.
Phase 1: Image Build (docker build) — happens before any container exists.
Dockerfile (recipe)
  → FROM ubuntu        → Layer 1 complete, locked (read-only)
  → RUN install nginx  → Layer 2 complete, locked (read-only)

Result: image named "my-nginx" (Layer 1 + Layer 2, both read-only)
At this point, no containers exist yet. There’s just one completed image.
Phase 2: Container Run (docker run) — uses the already-built image.
docker run my-nginx  → Container A born (empty writable layer added)
docker run my-nginx  → Container B born (empty writable layer added)
Both A and B reference the same image. Layer 1 (ubuntu) and Layer 2 (nginx) are both part of the image, so both are shared. The branching point isn’t Layer 2 — it’s the writable layer added on top.
Why CoW Is Efficient: Compared to a World Without It
Without CoW:
docker run my-nginx  → Copy entire image (500MB) → Container A
docker run my-nginx  → Copy entire image (500MB) → Container B
docker run my-nginx  → Copy entire image (500MB) → Container C
With a 500MB image, 3 containers would need 1.5GB. And copying 500MB each time takes a while.
With CoW:
docker run my-nginx  → Add empty writable layer (~0MB) → Container A
docker run my-nginx  → Add empty writable layer (~0MB) → Container B
docker run my-nginx  → Add empty writable layer (~0MB) → Container C
The 500MB image exists once on disk, and all three containers simply reference it. Total disk usage: 500MB + nearly nothing. Container creation is nearly instant.
CoW efficiency comes down to two things:
- Disk savings — The image is shared, not copied, so no matter how many containers you run, the image takes up space only once.
- Speed — Instead of copying the entire image, container creation only requires creating one empty writable layer — so containers start almost instantly.
Isolation Between Containers
When containers A and B are both launched from the same image:
- The base image layers exist exactly once on disk
- Each container has its own independent writable layer
- If container A modifies a file, container B still reads the original
- The writable layers are completely invisible to each other — fully isolated
When a Container Is Deleted
Deleting a container also removes its writable layer. All changes are lost.
“Containers are ephemeral.”
Data that needs to persist (database files, logs, etc.) should be stored outside the container using a volume. Volumes are independent of the container lifecycle.
4. OverlayFS and overlay2
What Is OverlayFS?
It’s a filesystem built into the Linux kernel. It wasn’t created by Docker — it predates Docker.
Breaking down the name: Overlay (to layer on top) + FS (File System) — a filesystem that stacks multiple directories on top of each other and presents them as a single unified directory.
Analogy: Like stacking multiple layers in Photoshop — you see one combined image, but each layer still exists independently underneath.
OverlayFS vs overlay2
| OverlayFS | overlay2 | |
|---|---|---|
| What it is | A Linux kernel filesystem feature (general-purpose technology) | Docker’s storage driver that uses OverlayFS (Docker-specific implementation) |
Docker used to support other storage drivers (AUFS, devicemapper, btrfs, etc.), but overlay2 became the default because of its superior performance and stability.
The Three Core Directories of overlay2
| Directory | Role | Analogy |
|---|---|---|
| lowerdir | Read-only image layers (multiple allowed) | Library shelves (original books) |
| upperdir | Container’s writable layer | Personal desk (copies, notes) |
| merged | Unified view combining lowerdir + upperdir | Shelves + desk appearing as one complete library |
When you run ls / inside a container, what you see is the merged directory.
Actual Directory Structure
/var/lib/docker/overlay2/
├── abc123/           ← Layer 1 (ubuntu base)
│   └── diff/         ← Actual files in this layer
│       ├── bin/
│       ├── etc/
│       └── usr/
├── def456/           ← Layer 2 (nginx installed)
│   ├── diff/         ← Only files added/changed in this layer
│   ├── lower         ← "My layer below is abc123"
│   ├── work/         ← Internal working directory for OverlayFS
│   └── merged/       ← (Only created when a container is running)
└── ghi789/           ← Container writable layer
    ├── diff/         ← Files copied via CoW and modified
    ├── lower         ← "My layers below are def456, abc123"
    ├── work/
    └── merged/       ← Final unified view seen by the container
The key is the diff directory. Each layer’s diff contains only what changed in that layer. The lower file acts like a chain, pointing to the layers below, which overlay2 follows to assemble the full view.
File Lookup Process
When a container reads /etc/hosts:
- Check ghi789/diff (writable layer) → not found
- Check def456/diff (nginx layer) → not found
- Check abc123/diff (base layer) → found! → return
The lookup goes top to bottom. If a modified version exists in the writable layer (ghi789/diff), it’s returned immediately without going deeper. The CoW copy shadows (overlays) the original.
Command to Inspect in Practice
docker inspect <containerID> --format '{{.GraphDriver.Data}}'This shows the actual LowerDir, UpperDir, and MergedDir paths.
5. Whiteout — Handling File Deletion
The Problem
Original files in the lowerdir are read-only and cannot actually be deleted. But from the container’s perspective, a file should appear to be gone.
The Solution: Whiteout Files
When a container deletes /etc/someconfig, overlay2 creates a special file in the upperdir (writable layer):
ghi789/diff/etc/.wh.someconfigThis is an empty file prefixed with .wh. (“wh” = whiteout).
When overlay2 builds the merged view, the presence of this file causes it to hide the original from the layers below — even though the original still exists.
Analogy
Imagine text on a lower Photoshop layer being covered with correction tape on an upper layer — the final result hides it. Remove the tape, and the original text is still there.
In Git terms, this is closer to git rm (recording the deletion of a tracked file) than .gitignore (never tracking a file in the first place).
Summary
- Original file → still exists in lowerdir
- Whiteout file → created in upperdir
- Container’s merged view → the file doesn’t appear
6. Full Summary
Docker image layers (read-only diffs)
        ↓
OverlayFS/overlay2 merges them into a single filesystem view (merged)
        ↓
When a container writes, CoW records changes only in the writable layer (upperdir)
        ↓
When a file is deleted, a whiteout file masks the original| Concept | One-line summary |
|---|---|
| Image Layer | Read-only diff created per Dockerfile instruction |
| CoW | On write, only the target file is copied to the writable layer and modified |
| OverlayFS | Linux kernel filesystem that stacks multiple directories into one |
| overlay2 | Docker’s storage driver that uses OverlayFS |
| Whiteout | A special file (.wh.) that masks an original to represent deletion |
Comprehension Check
Question 1. Inside a container, you try to read /etc/hosts with cat. The file doesn’t exist in the upperdir or layer 2, and is only present in layer 1 (ubuntu base). Describe the order in which overlay2 searches for the file, and whether any copying occurs.
Question 2. Containers A and B are launched from the same image. Container A deletes /etc/nginx/nginx.conf. Describe what happens in each of the following:
- What appears in container A’s upperdir?
- What happens to the original nginx.conf in the lowerdir?
- What happens when container B tries to read nginx.conf?
Question 3. An image is built from the Dockerfile below, a container is run from it, and /app/data.txt is modified inside the container. Explain this from the perspective of image size and container disk usage.
FROM ubuntu:22.04
RUN echo "hello" > /app/data.txt
RUN echo "world" >> /app/data.txt
The Trap of Files Duplicated Across Layers
FROM ubuntu:22.04
RUN echo "hello" > /app/data.txt
RUN echo "world" >> /app/data.txt
data.txt is created in layer 2, then modified in layer 3. Since layer 2 is already read-only, the entire data.txt is saved again in layer 3. The result is two copies of the same file, unnecessarily bloating the image.
If you then modify data.txt after running a container, CoW fires and creates yet another copy in the upperdir. At that point, data.txt exists in three places:
- Layer 2: “hello” → read-only, shadowed but still on disk
- Layer 3: “hello\nworld” → read-only, also shadowed
- upperdir: modified version → the only one visible
The fix:
RUN echo "hello" > /app/data.txt && echo "world" >> /app/data.txt